

Students are awarded a yellow tag once they have shown competency in sparring and the principals involved with that. Sparring is against live opponents, where reactions are predictable but sometimes very surprising.
1 for 1 Body Kicks (above the waist)
Shadow Sparring
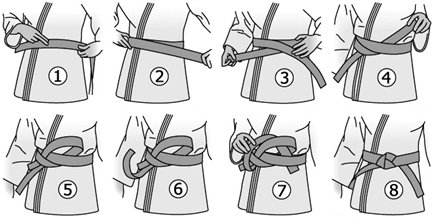
Tie Own Belt
Ensure you maintain a good stance with your hands up
Demonstrate correct footwork
Throw controlled kicks above the waist at your opponent's body
Defend with correct technique.
1 for 1 Drills are a great way to begin your sparring journey while honing your skills. Even our World Champion competitors regularly practice 1 for 1 sparring to refine their skills.
Ensure you have correct footwork and stance
Maintain both offensive and defensive techniques
Always think about how to improve your moves
Never forget to use shadow sparring to predict combinations based on your opponents moves.
Shadow Sparring is one of the most useful training tools you can develop to improve your technique. Once you have developed shadow sparring your strikes will be pin point accurate and your defence impenetrable. For now focus on standing strong in correct stance and staying on balance whilst you strike and defend against an imaginary opponent.
Demonstrate how to correctly tie your White Belt.
1 Start by placing the middle of the belt just below your belly button. Then wrap the belt around the back
2 Cross the belt over behind your back and bring the ends back to the front.
3 Place the right end over the top of the left end.
4 Tuck that original right end (now on the left side of your body) underneath both the left end and the centre of the belt.
5 Continue that end through the loop it formed
6 & 7 Now the other end loops up and behind the first end and between the waist band of belt.
8 Now pull tightly on both ends to fasten your belt.
Knowing how to tie your belt so the ends are even and the belt is presentable will ensure that everyone knows you take your training seriously. Your belt represents your progress and what you know, firstly by its colour and secondly by the coloured tags which are attached to it. N.B. This method of tying ensures the belt does not fall loose with hard training.
Was this information helpful?